To remove a green screen in DaVinci Resolve Free, add a Delta Keyer in Fusion and sample the screen color. That creates transparency where the green was. Getting a usable cutout usually also means cleaning the matte, removing objects outside the subject, and checking reflected green on clothing or skin.
The comparison above shows those jobs on a real production plate, rendered in Resolve Free 21.1 on macOS:
- Original: the actor, uneven green backing, lights, stands, and floor.
- Initial key: the green disappears, but non-green equipment remains.
- Refined: threshold adjustments and an animated mask isolate the actor.
- Final alpha: white shows what stays; black shows what becomes transparent.
The actor points and shifts slightly during this three-second excerpt. That movement matters: our first static mask looked acceptable on one frame but clipped the shoes later. The finished example uses an animated shape.
Download the source clip, native renders, and editable Resolve project to inspect the same result. This tutorial uses footage shot against green. For ordinary footage without a screen, see background removal in Resolve Free with AI.
1. Add Delta Keyer to the foreground clip
Import the green-screen clip and put it on an Edit-page timeline. Select it, place the playhead inside it, and open Fusion.
A simple clip begins with two connected nodes:
- MediaIn1 supplies the footage.
- MediaOut1 sends the result back to the timeline.
Select MediaIn1, press Shift+Space, search for Delta Keyer, and click Add. It should appear between the source and output. A node is a processing step; here, the picture passes through the keyer before reaching the timeline.
With DeltaKeyer selected, drag the Background Color eyedropper from its Inspector onto a representative area of green in the viewer. Avoid a tracking marker, bright light, or the subject itself. The sampled color becomes the keyer's reference.
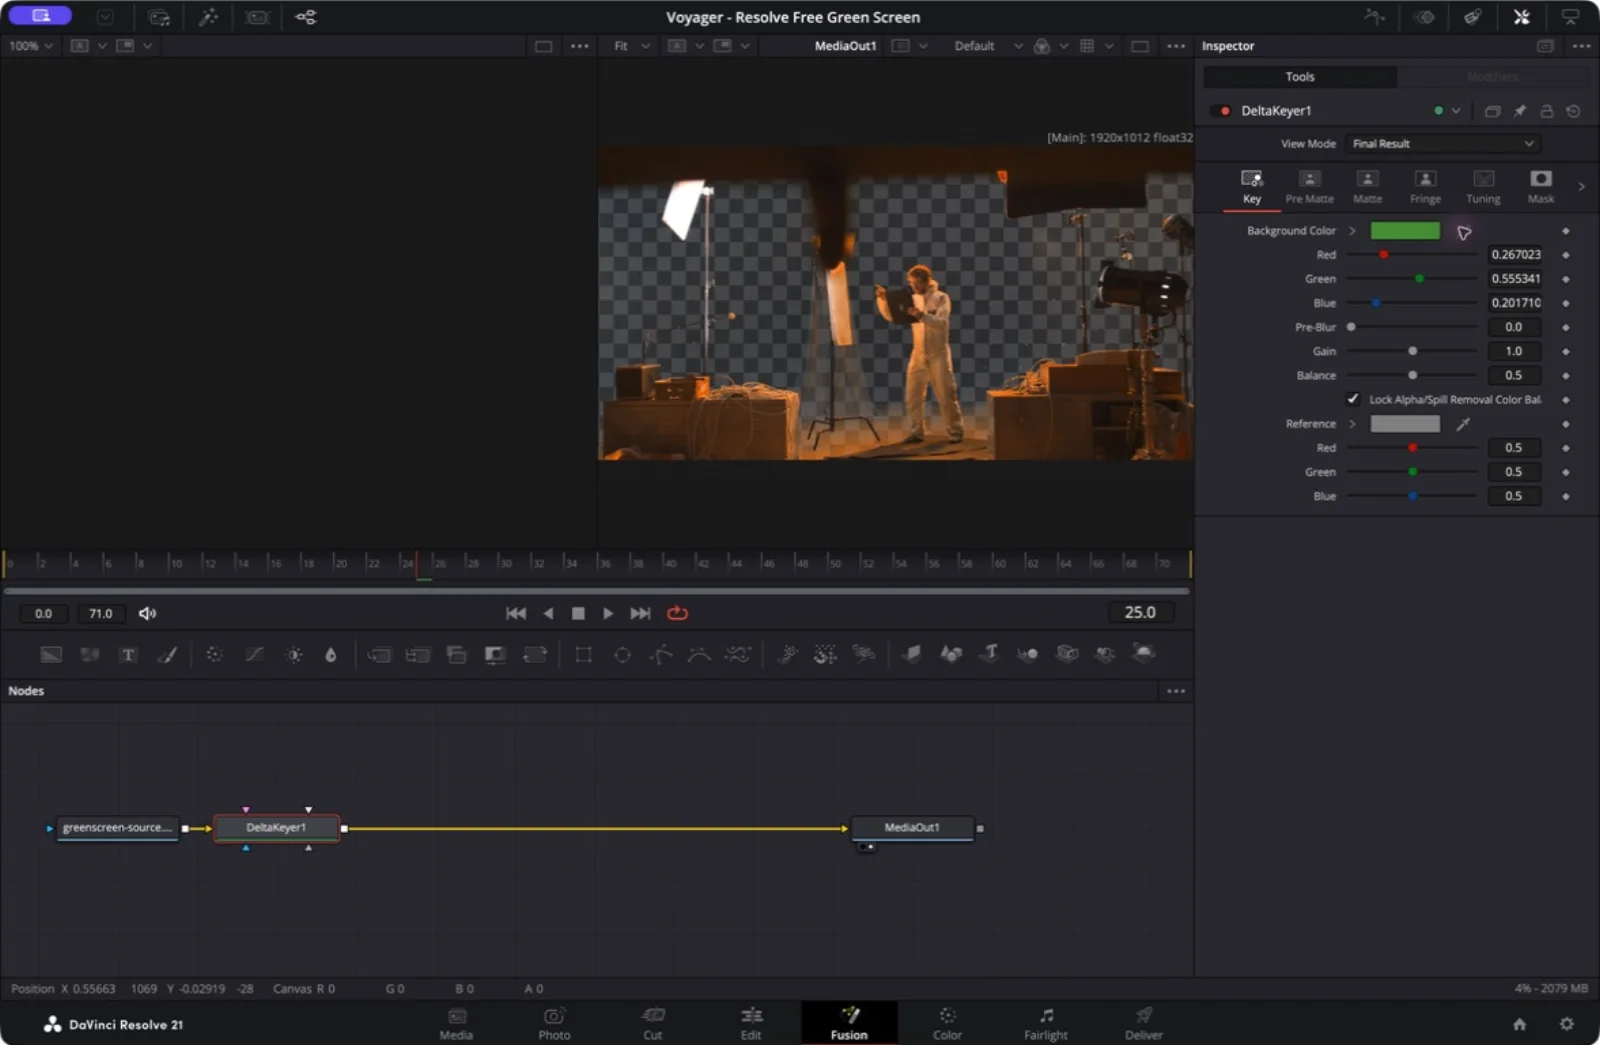
This is the basic workflow described in Blackmagic's reference manual, Pulling a Green-Screen Key Using the Delta Keyer. Do not copy our sampled RGB numbers onto different footage; sample your own screen.
2. Put a background underneath the keyed image
For the test, we use a solid navy background so unwanted fragments are easy to spot. You can replace it with another image or video later.
Click empty space in the node graph, then use Shift+Space to add a Background node. Choose its color in the Inspector. Add a Merge node and connect:
- Background1 → Merge1's yellow Background input.
- DeltaKeyer1 → Merge1's green Foreground input.
- Merge1 → MediaOut1.
The Merge combines the keyed foreground with the replacement background. Keep its normal Over operation for this basic composite.
The initial result in our comparison already uses Delta Keyer's default Soft Color spill treatment. Its remaining equipment is not a spill problem. Changing the color controls cannot make a black light stand disappear while reliably preserving other black objects in the shot.
3. Inspect the alpha before tightening the edges
The alpha channel stores transparency. In an alpha view, black is transparent, white is opaque, and gray is partially transparent. Fine hair and motion-blurred edges may legitimately contain gray; the core of an opaque coat should not become see-through.
Select DeltaKeyer1 and press 1 to load it into the left viewer. Keep the keyer's View Mode on Final Result. Click that viewer and press C to switch between color and alpha. This lets you inspect the keyed output, including the connected mask, before it is merged onto an opaque background.
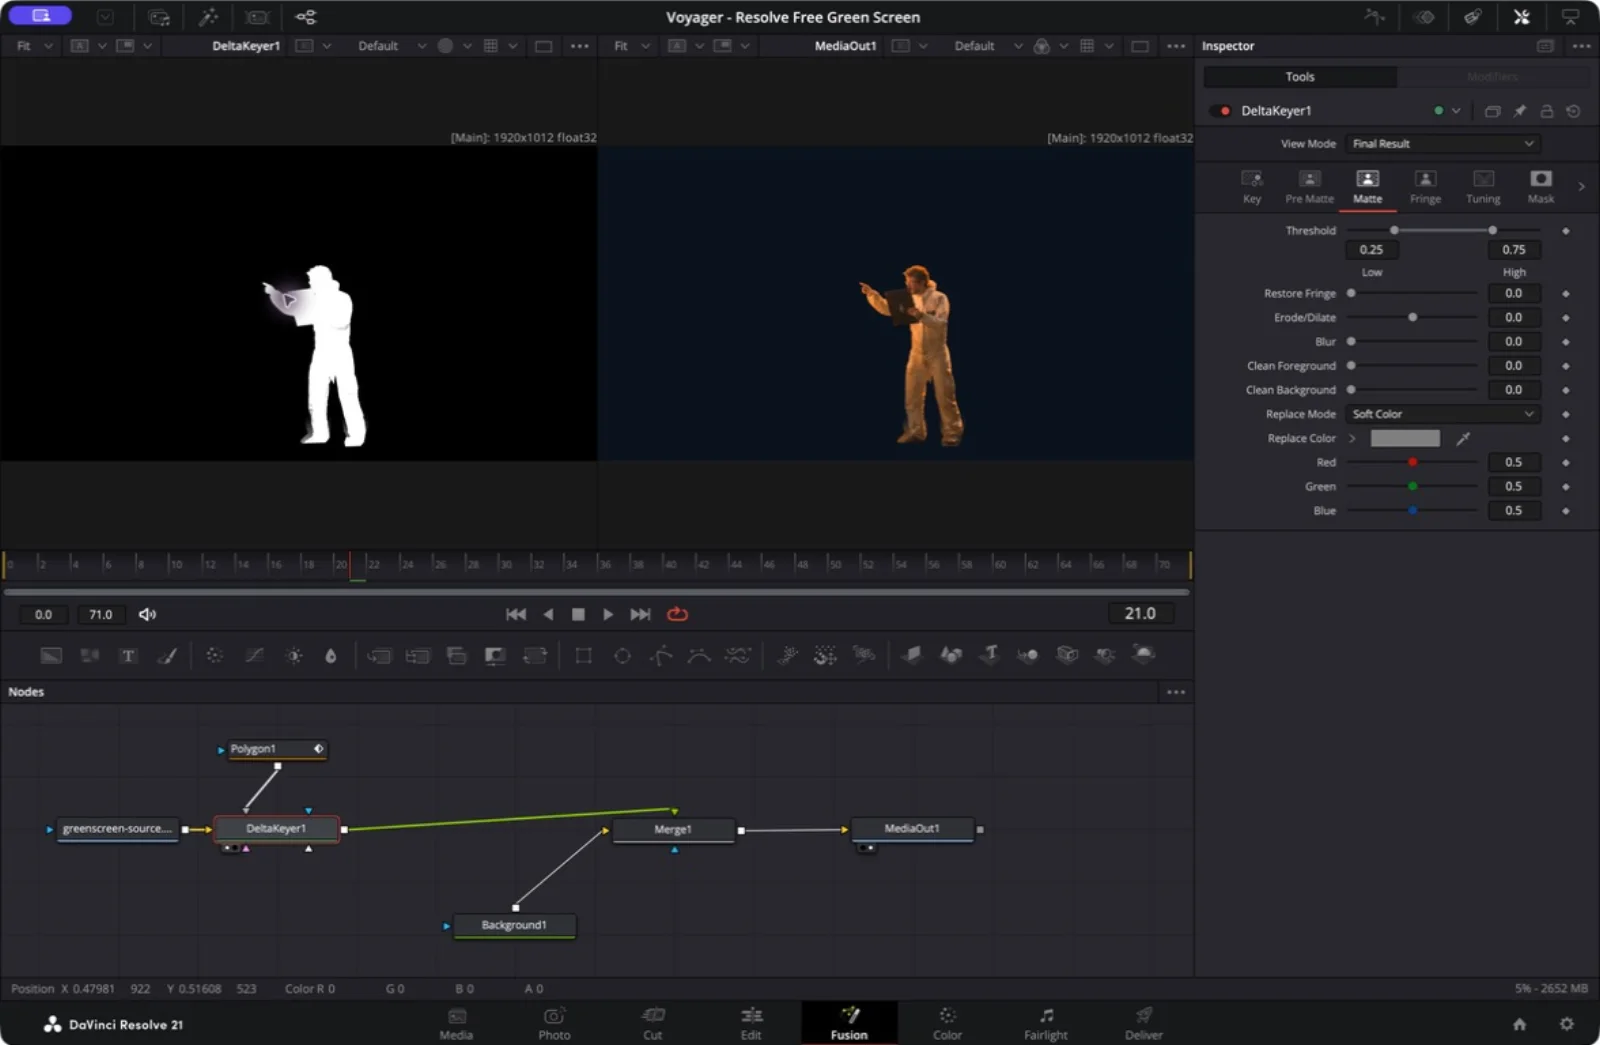
On Delta Keyer's Matte tab, the low and high Threshold controls help push background residue toward black and foreground areas toward white. Adjust them gradually while watching both the matte and the color image.
Our tested settings were:
| Control | Initial key | Refined key |
|---|---|---|
| Threshold Low | 0.00 | 0.25 |
| Threshold High | 1.00 | 0.75 |
| Replace Mode | Soft Color | Soft Color |
| Garbage mask | None | Animated, inverted polygon |
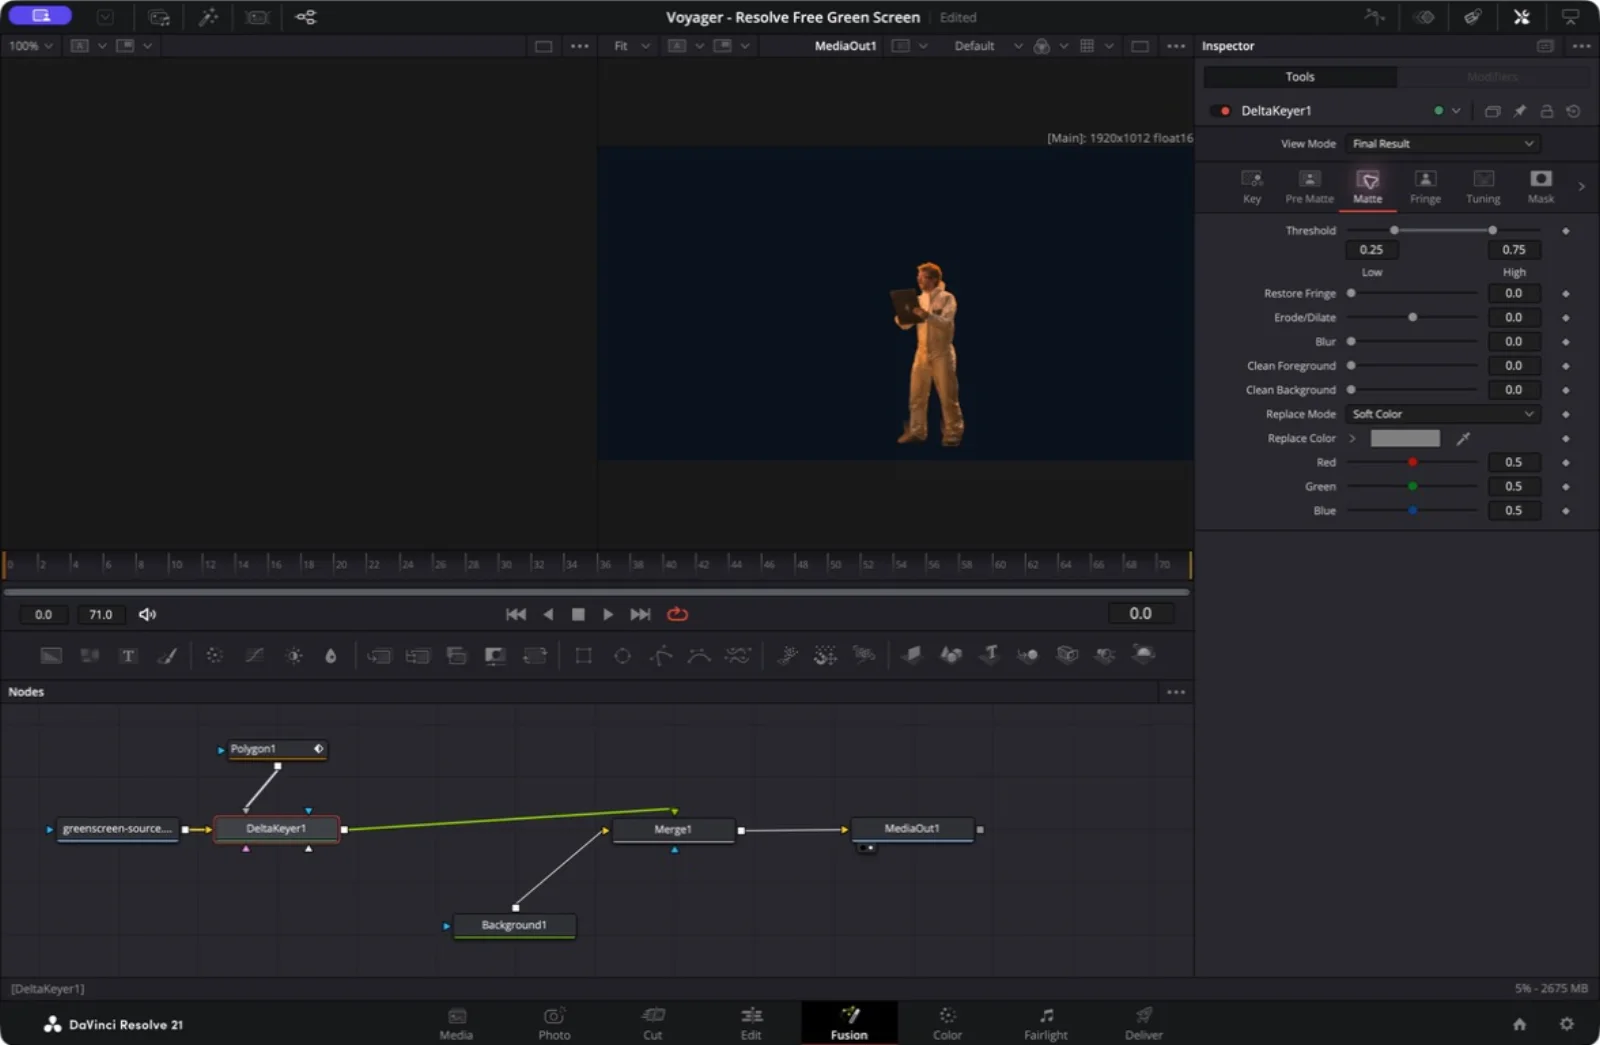
Increasing contrast in the matte can also erase translucent detail. If hair breaks up or the moving hand gets a hard cutout edge, back off. In this example, Erode/Dilate, Blur, Clean Foreground, and Clean Background remain at zero. We did not solve the remaining objects by repeatedly shrinking the subject's outline.
4. Remove the studio gear with a garbage mask
A garbage mask removes regions that are definitely outside the wanted foreground. It handles the lights, stands, and unwanted floor in this plate, leaving the keyer to work on the screen around the actor.
Add a Polygon node and draw a closed shape around the actor and the board he holds. Leave room around moving fingers and hair. Connect the polygon's output to Delta Keyer's gray Garbage Matte input.
Garbage Matte makes the mask's white regions transparent. Because our polygon encloses the actor, enable Invert on the Polygon node: the area outside the shape becomes the region to remove. The blue Effect Mask input has a different job; it limits where the keying operation runs.
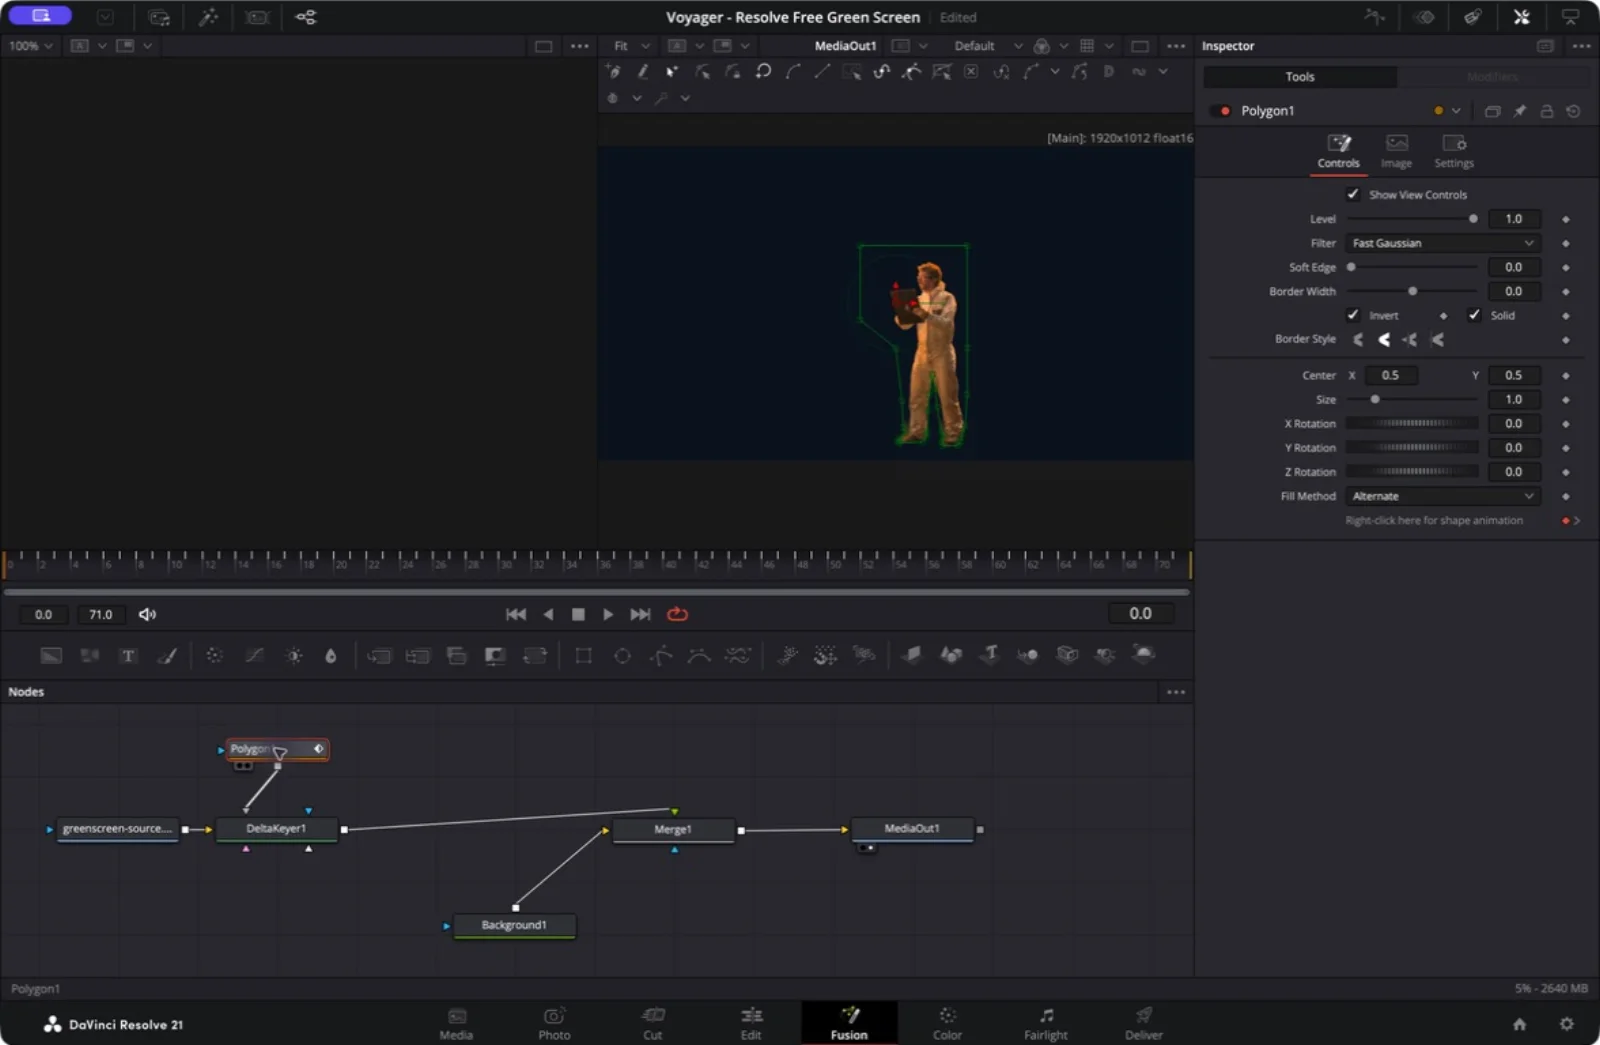
The floor requires extra care because it is not uniformly green. We fitted the shape around the shoes and through the gap between the legs. A broad rectangle left a visible floor patch there, even after the green background had disappeared.
Scrub the whole shot before calling the mask finished. If the subject or camera moves, animate the shape or use a suitable tracking workflow. For manual shape animation, establish the polygon on a clear frame, move to a later frame, and adjust its points; verify the resulting shape keyframes in Fusion's Keyframes or Spline panel. Check the frames between your adjustments too.
In the supplied project, the mask follows roughly 43 pixels of horizontal drift across the excerpt. The animation was prepared from source-frame motion and checked in Resolve. It is specific to this shot, not a mask preset to apply to unrelated footage.
5. Treat green spill as a color problem
Spill is reflected screen color on the subject. It can remain on an otherwise correct cutout, especially around light clothing, hair, and reflective surfaces.
In Delta Keyer's Matte tab, Replace Mode → Soft Color provides the built-in color replacement used in this test. The Source option retains the original source color and disables that spill correction, which can be useful when comparing or planning a separate color-correction pass. Blackmagic discusses this distinction in the manual's Dealing with Spill section.
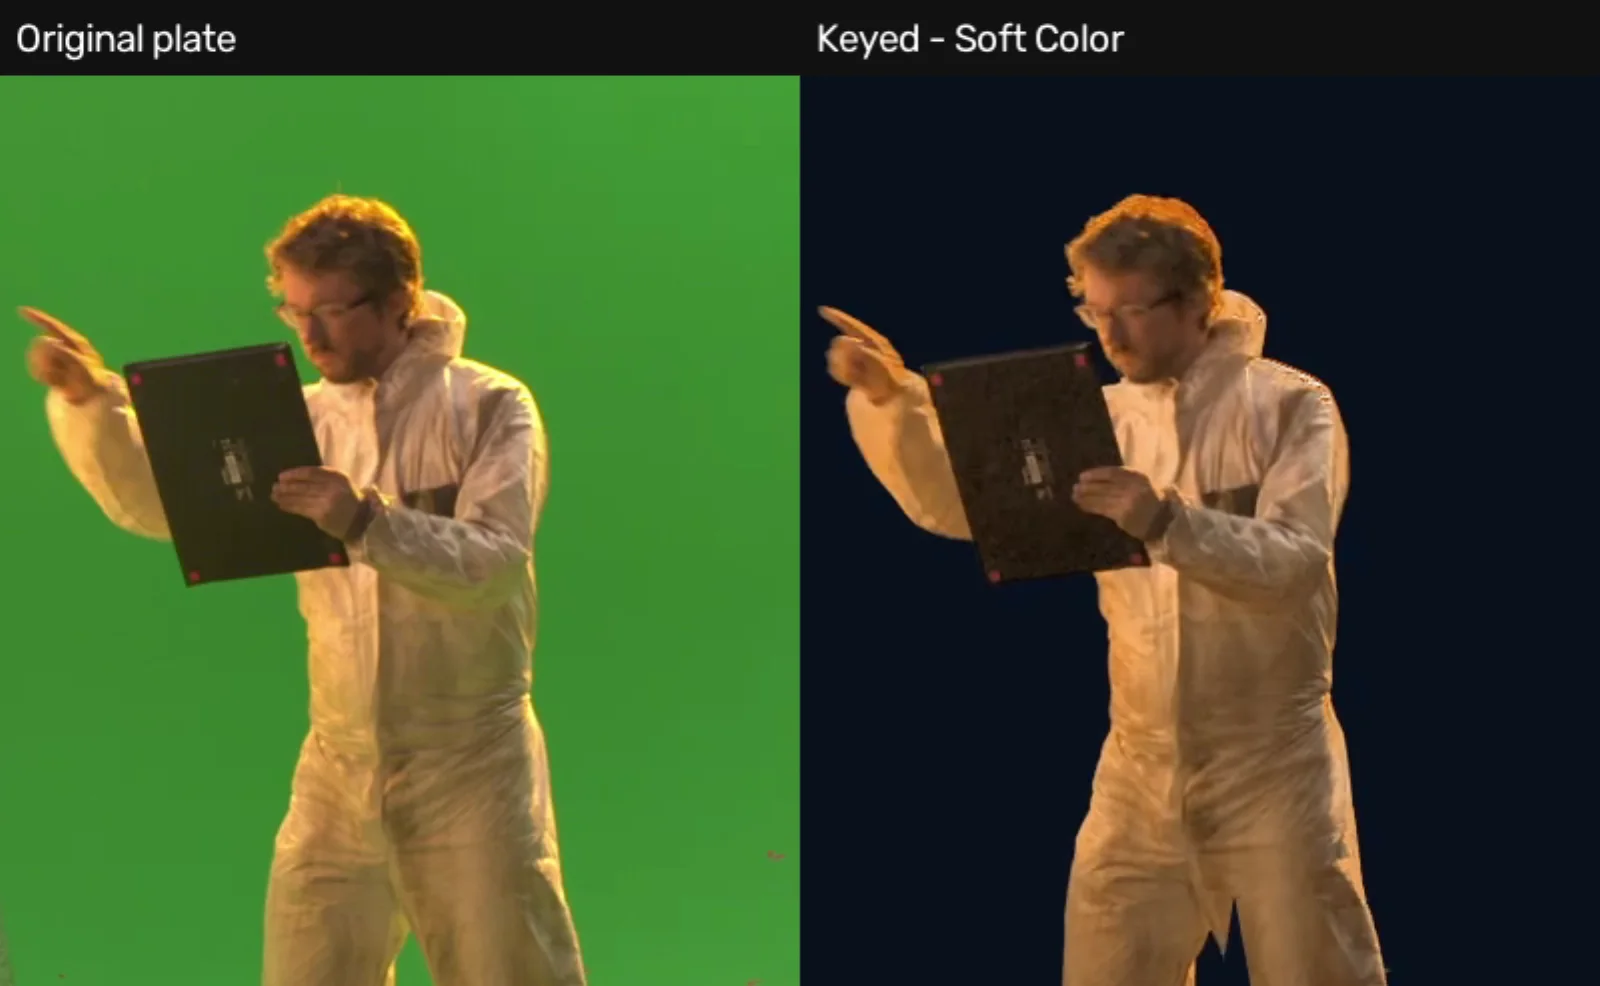
Both keyed versions in the opening comparison use Soft Color. The improvement from initial to refined comes from the matte thresholds and mask, not a change of spill mode.
If the edge is the wrong shape, inspect the alpha and mask. If the shape is right but its color is green, inspect spill treatment. Pushing matte thresholds to fix reflected color can remove real hair or clothing without producing a better composite.
The actor remains warmly lit after keying. Removing the screen does not relight him to match a new environment. Our navy plate is a diagnostic background, not a photorealistic scene replacement.
6. Check the moving result and export it
Review the first frame, last frame, and the moments where hands or clothing approach the mask. Play the clip at normal speed, then inspect suspect edges more closely. A mask can cut off a finger for a few frames while looking fine in a screenshot.
Check on a contrasting light background as well as your intended background when finishing your own shot. A dark plate can hide dark contamination, so use the alpha view too. Minor edge residue around the lower legs and shoes may still need finer shot-specific work for a demanding composite; the test is not a claim of perfect production roto.
On Deliver, confirm the intended dimensions and frame rate and render a short section. Watch the exported file, not just the viewer. Our four native sections are each three seconds / 72 frames at 24 fps, for 12 seconds / 288 frames total at 1920×1012.
The finished composite can use an ordinary delivery format such as H.264. Keep the Resolve project and source if you want to change the background later. A flattened export no longer contains separately editable foreground and background layers.
This workflow ran in the Free edition. For the broader upgrade decision, see DaVinci Resolve Free vs Studio.
Source preparation, project files, and test method
Tested September 18, 2026, in Resolve Free 21.1 on macOS. We used frames 24–95 of the Tears of Steel 04_3b plate from the original footage archive, interpreted at 24 fps.
Blender's release notes for the footage specify Rec.709 scene-linear EXRs after conversion from ACES. The downloadable ProRes 4444 source is a display-ready version prepared using Blender 5.2's OpenColorIO configuration, Linear Rec.709 to Rec.1886 / Standard. No key was baked into that source, and no audio is included. Ordinary display-ready camera footage does not require this EXR preparation step.
An assistant prepared the media and editable Fusion composition files. Delta Keyer and Merge ran natively in Resolve. The polygon animation was derived from local source-frame matching, then reviewed in the native renders; this is not a demonstration of Resolve's automatic Tracker. A diagnostic composition copies the final keyer's alpha into RGB for the fourth rendered section.
Download the bundle, extract it, and import Voyager-green-screen.drp through Resolve's Project Manager. Relink greenscreen-source.mov in the Media Pool if it appears offline. The timeline contains Original at 0–3 seconds, Initial Key at 3–6, Refined at 6–9, and Final Alpha at 9–12. The native H.264 export was remuxed to MP4 without re-encoding the video; labeled comparison panels and the viewing copy have additional web encoding.
Footage: (CC) Blender Foundation | mango.blender.org, Tears of Steel. Licensed under Creative Commons Attribution 3.0; see the project's sharing terms. Modifications include color conversion, excerpting, keying, animated masking, compositing, and comparison labels. This is a technical tutorial; no endorsement by the performers is implied.
Make your next project in Voyager
Create an account, download Voyager, and start making.