You can clean up a noisy voice recording and finish the edit in DaVinci Resolve Free, even without Studio's Voice Isolation feature. The approach is to process the audio outside Resolve, then bring the cleaned recording back onto the same timeline.
This tutorial uses an AI assistant to do the file work: extract the audio, send it to a voice-cleanup model, check the returned file, and prepare it for import. Resolve remains the editor. Your picture stays in place, and you keep the original audio in case the cleanup removes something you want.
There are two things to get right: how the voice sounds after processing, and whether it still lines up with the picture. Our example caught a small timing change that would have been easy to miss by checking the file length alone.
Hear the example first
The recording below contains the same synthetic voice twice. From 0–17 seconds, we added steady, fan-like noise and a low hum. From 17–34 seconds, we added intermittent noise bursts. These are controlled mixtures, not recordings of a real fan or a noisy location.
Before cleanup
After cleanup and timing correction
Reference: the voice before noise was added
The listening copies were level-matched to approximately −20 LUFS integrated, a measure of average perceived loudness. We used a constant gain adjustment, not compression. Matching levels makes it harder to mistake a louder recording for a better one. Keep your playback volume the same when switching between them.
Listen beyond the gaps between sentences. Check the beginning of “Start,” the consonants in “microphone close,” and the final words of each sentence. A quiet background is useful only if the speech remains usable.
The sample bundle includes the noisy source, the unprocessed clean voice for comparison, the returned model audio, the aligned WAV, measurements, and an editable Resolve project. You can follow the editing steps without paying to process the example again.
What you need
- DaVinci Resolve Free and a recording you are allowed to upload for processing.
- Codex, OpenAI's coding assistant, running locally with access to your files. You give it instructions in a conversation; it writes and runs the file-processing commands.
- fal, a hosted service that provides access to AI models. We used its ElevenLabs Audio Isolation model to separate speech from background sound.
Codex connects to fal through MCP, a standard for connecting an assistant to external tools. That connection lets it call the audio model; it does not give it control of Resolve. The editor can open the resulting audio through its normal import commands.
If you have not connected the two tools, follow the connection section in our AI captions tutorial. It covers the API key and the Codex setup command. OpenAI's MCP documentation explains the connection options.
This is a workflow for the free editor edition, not a free hosted service. On September 18, 2026, fal listed Audio Isolation at $0.10 per minute. At that rate, 34 seconds works out to about $0.057 before any billing rules or other costs. That is an estimate, not a receipt. Codex access is separate.
Blackmagic lists Voice Isolation as a Studio feature in its edition comparison. This external workflow does not unlock that control. If you're weighing other reasons to upgrade, see Resolve Free vs Studio.
1. Export the dialogue you want to repair
Start with the finished cut, or a clearly defined section of it. If you remove pauses or change speed after processing, the cleaned file will no longer line up automatically.
For a single video, Codex can extract its audio. For an existing Resolve edit, export the dialogue track or a reference of that section. Keep music and sound effects separate where possible: a voice-isolation model is intended to remove non-voice sound, including a music bed you may want in the final mix.
Ask the assistant to create a working copy and retain the full timing:
Prepare this recording for dialogue cleanup:
/path/to/my-video.mp4

Keep the source unchanged. Extract a WAV of its audio without
trimming the start, removing silence, or changing playback speed.
Report duration, sample rate, and channel count.

Use a separate working folder. Keep the original and all returned
model files so I can compare them or undo the cleanup later.
A WAV is an audio file format suitable for editing. A sample rate such as 48 kHz describes how many audio samples are stored each second. It is different from the video's frame rate. Converting an audio file to the project sample rate should not change how fast the speaker talks.
Our input was a 34.000-second, 48 kHz mono WAV. It includes quiet space before and after the speech, which helps reveal both residual noise and unwanted trimming.
2. Ask the assistant to isolate the voice
Here is the processing brief. Replace the file name and footage description, and choose a spending limit appropriate to your recording:
Clean the dialogue in noisy-input.wav using the connected fal tools.
I authorize uploading this recording to fal for this task.

Inspect the current schema and pricing for an audio-isolation model.
Report the estimate before submitting a paid request.

Remove background noise while retaining the existing spoken voice.
Do not generate a replacement voice, rewrite speech, remove pauses,
or change the picture edit.

Save the unmodified model result. Then make a WAV suitable for a
48 kHz Resolve timeline. Compare its duration and speech timing
with the input, including near the beginning and end.

Give me before/after listening copies at matched loudness. Flag
clipping, missing speech, timing offsets, or any need for manual review.
Our request used fal-ai/elevenlabs/audio-isolation, with the uploaded WAV supplied as audio_url. The model's API schema accepts an audio URL or a video URL. For this run, it did not expose a cleanup-strength parameter. Asking the assistant to set an invented “denoise strength” value would not provide that control.
The model returned a mono MP3 at 44.1 kHz. We kept that file, then decoded and resampled a copy to 48 kHz WAV for the edit. Converting MP3 to WAV does not recover information lost through compression; it provides a convenient working format.
3. Compare the voice and check synchronization
Switch between the matched listening copies using headphones. Listen to the same phrase each time. Pay particular attention to quiet syllables, breaths, word endings, and background sound that overlaps speech.
If the cleanup makes words thin, watery, or hard to understand, keep the original for that passage or try a different method on a short excerpt. Do not approve a whole interview because the first silent gap sounds clean. Clipping, strong wind hitting a microphone, reverberation, and overlapping voices need their own tests; our synthetic examples do not establish how this model handles them.
Then check the timing. In our run:
| Check | Result |
|---|---|
| Original audio duration | 34.000 seconds |
| Returned MP3 duration | About 34.038 seconds |
| Speech delay measured in four windows | About 25–30 milliseconds |
| Correction applied to this file | Advance by 1,312 samples at 48 kHz, or 27.33 ms |
| Corrected working file | Exactly 34.000 seconds |
The assistant compared short waveform sections against the clean reference used to make our controlled mixture. This method is called cross-correlation: finding the relative offset at which two signals match most closely. After the correction, the remaining offsets in those four windows were within about 2.6 milliseconds.
The correction removed a small amount from the beginning and adjusted the speech-free tail to the original duration. It did not stretch the voice. The numerical correction belongs to this file; do not apply 27.33 milliseconds to your own recording without checking it.
For a real recording without a clean reference, compare distinct speech onsets against the original audio and inspect synchronization with the picture at several points. If the offset grows over time, investigate a changed playback speed or mismatched edit. A constant shift is not a cure for drift.
4. Bring the cleaned WAV into Resolve Free
There are two ways to finish the handoff.
Add the audio to your existing edit
- Import the cleaned WAV into the Media Pool.
- Place it on a new audio track, aligned with the start of the source section you processed.
- Mute the corresponding original audio. If the original track contains other clips you need, mute or disable only the replaced section.
- Compare the beginning, middle, and end before exporting.
Keep the original available for comparison. Playing both recordings at once can bring the noise back and create an echo or a hollow sound if their timing differs.
Let the assistant prepare an importable timeline
For this example, Codex also created an FCPXML file. This is a timeline-interchange format: it describes which media files to use, where their clips begin, and how long they run. Despite the name, you do not need Final Cut Pro installed to import it into Resolve.
Ask for a separate timeline rather than replacing your current edit:
Prepare an FCPXML timeline for Resolve using noisy-source.mp4
and cleaned-aligned.wav. Keep the existing picture unchanged.

Place both files at timeline zero. Match the source video's
1920x1080 resolution, 24 fps, and 34-second duration. Put the
cleaned WAV on a separate audio track. Retain the original audio
for comparison, but it must not play in the final mix.

Use the actual local file paths. Do not overwrite my existing project.
Tell me what to verify after importing it.
In Resolve, choose File → Import → Timeline, select the FCPXML, and check the import settings. Enable Automatically import source clips into media pool and confirm the frame rate, resolution, and start timecode. The interchange file references your media; it does not contain the recording itself. Apple documents the format's media and timeline structure.
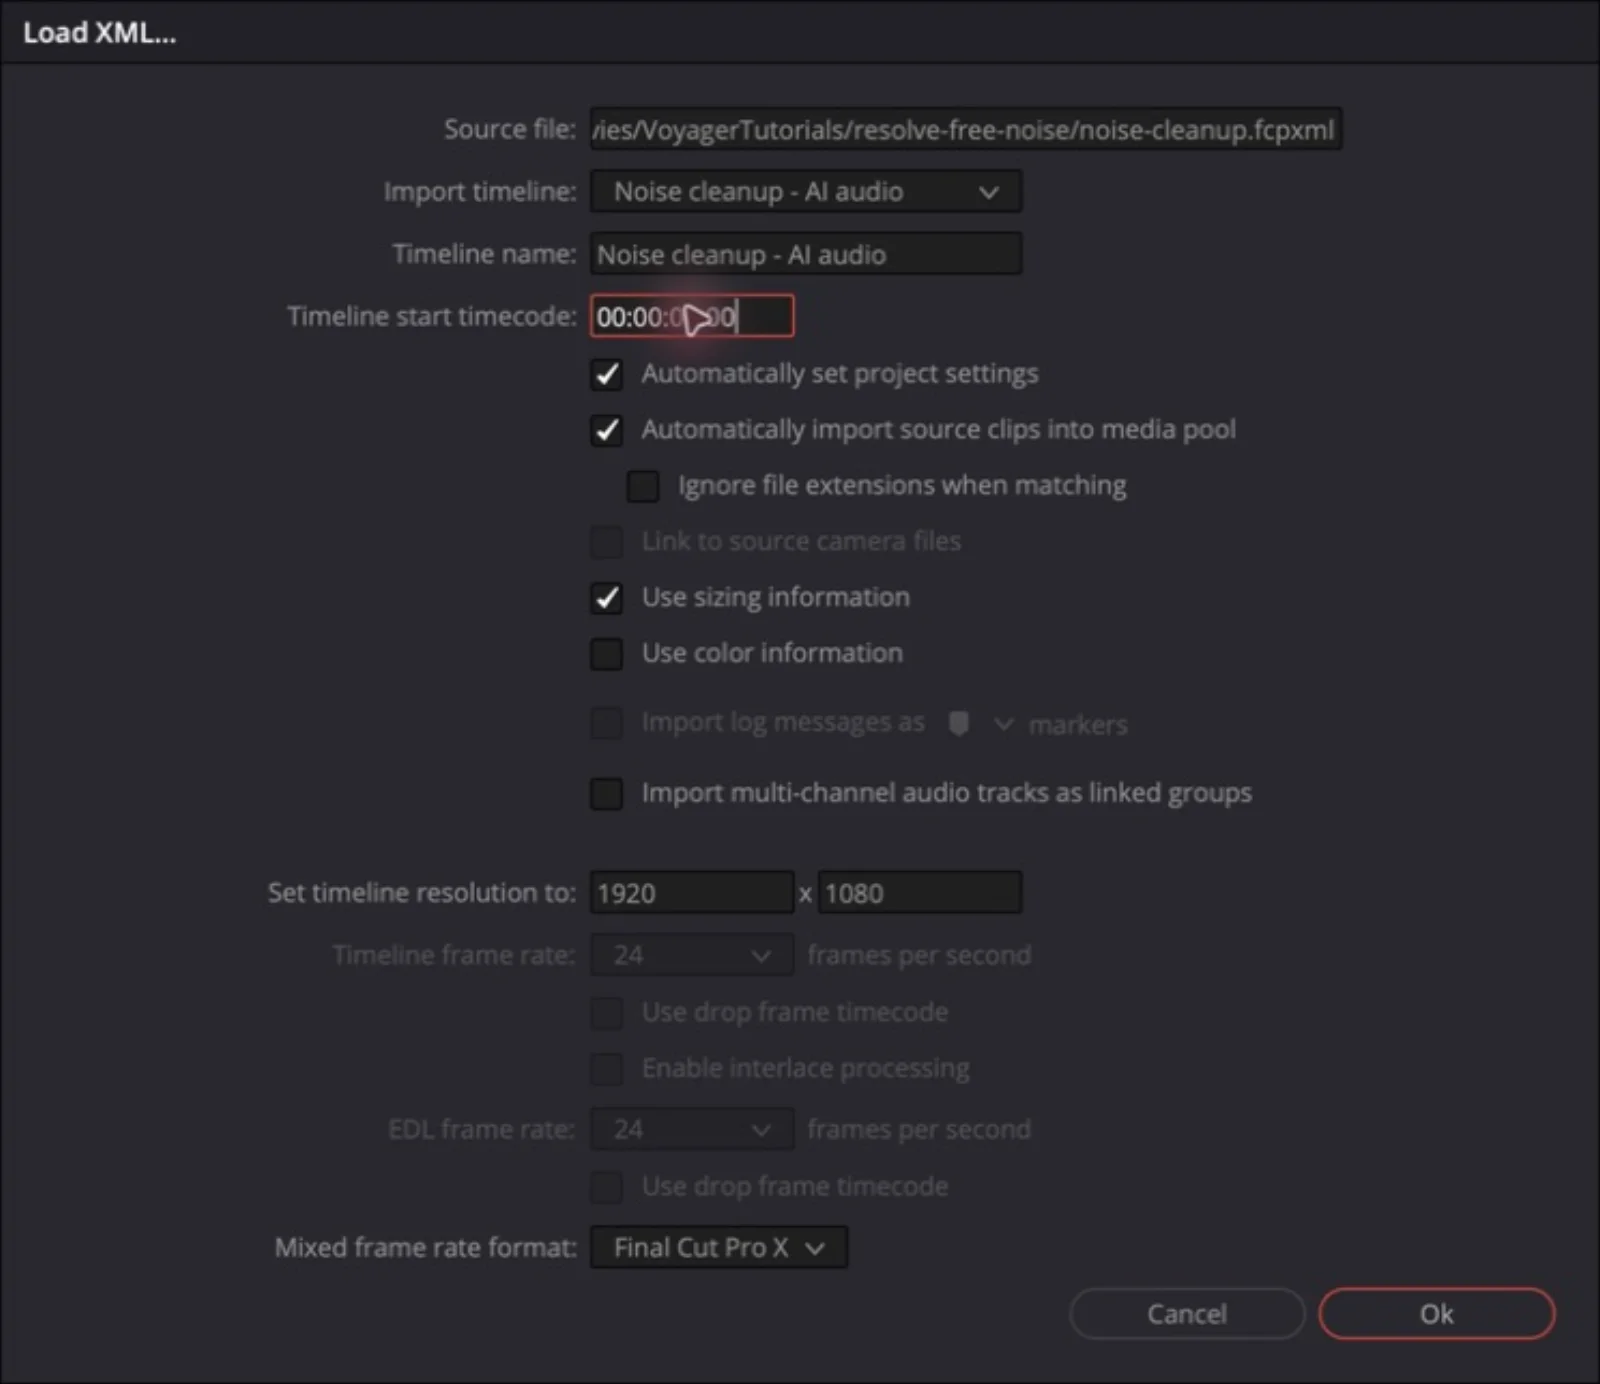
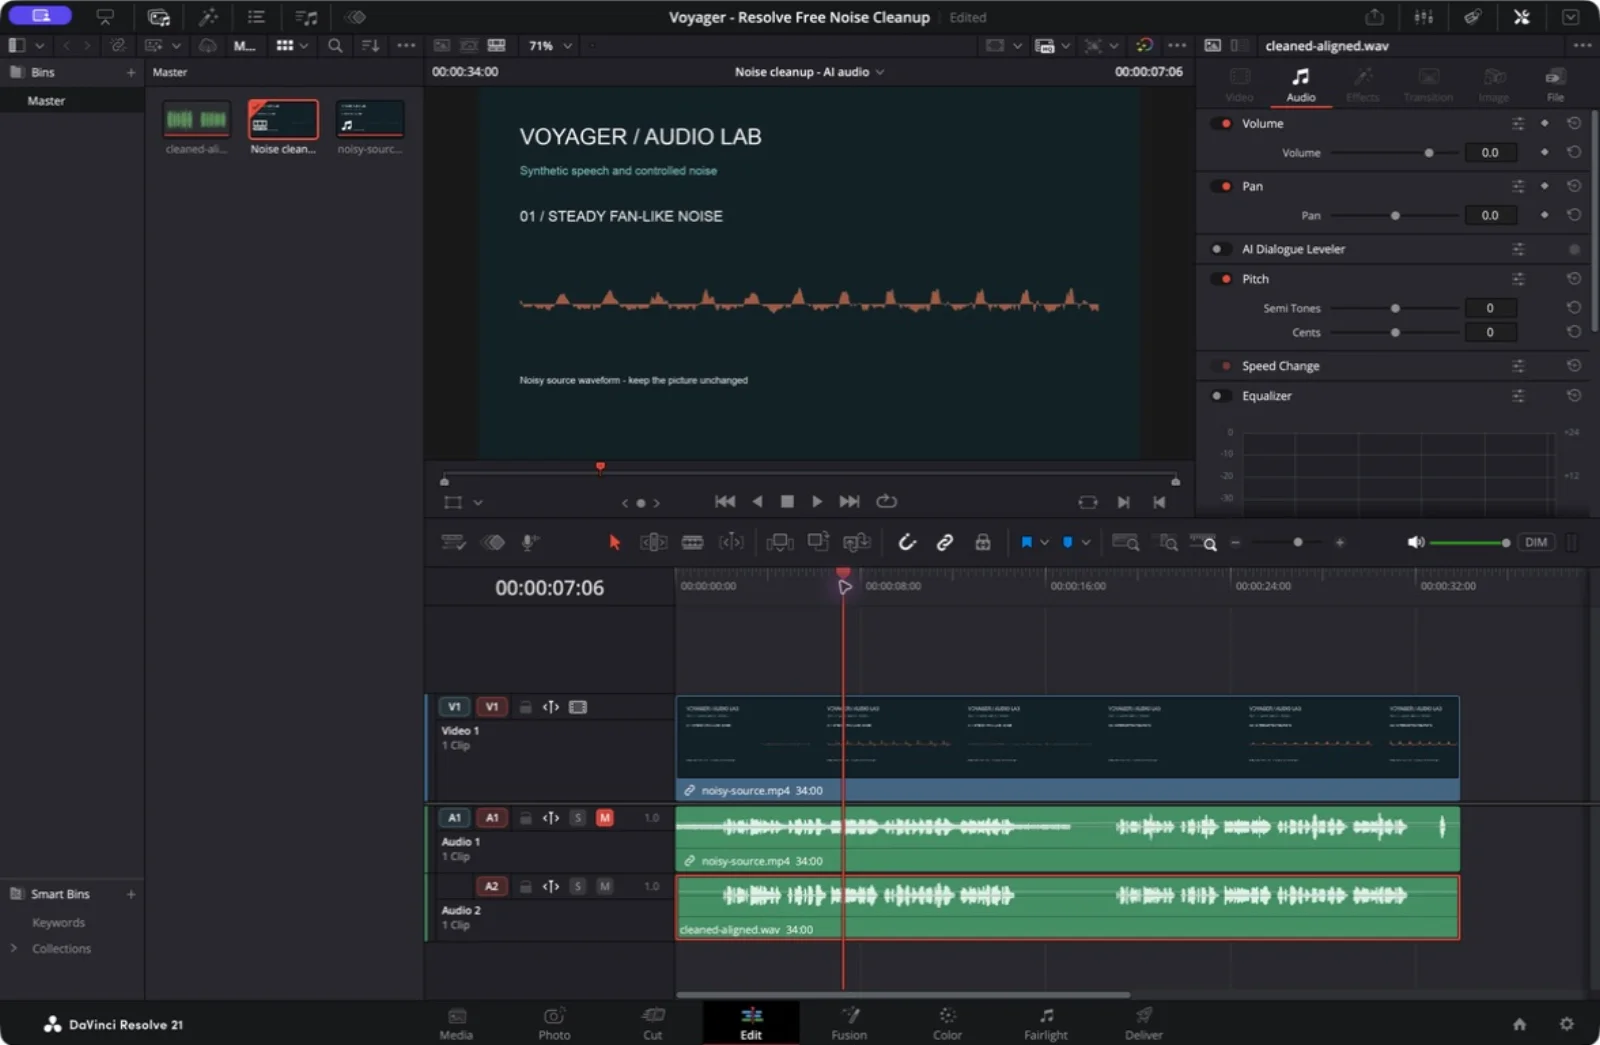
Verify the original audio is actually muted after import. Our FCPXML included an audio-disable setting, but the noisy source was still present on A1 in Resolve. We explicitly clicked M on A1 before rendering. This is why a successful timeline import still needs a mix check.
5. Export, then inspect the exported file
Open the Deliver page. Set the output name and folder, choose your usual video format, and make sure audio export is enabled. Add the job to the render queue and render it.
Our native export used QuickTime with H.264 video and PCM audio. The MP4 below is a web copy of that render: the picture was copied without re-encoding, and the audio was encoded to AAC for browser playback.
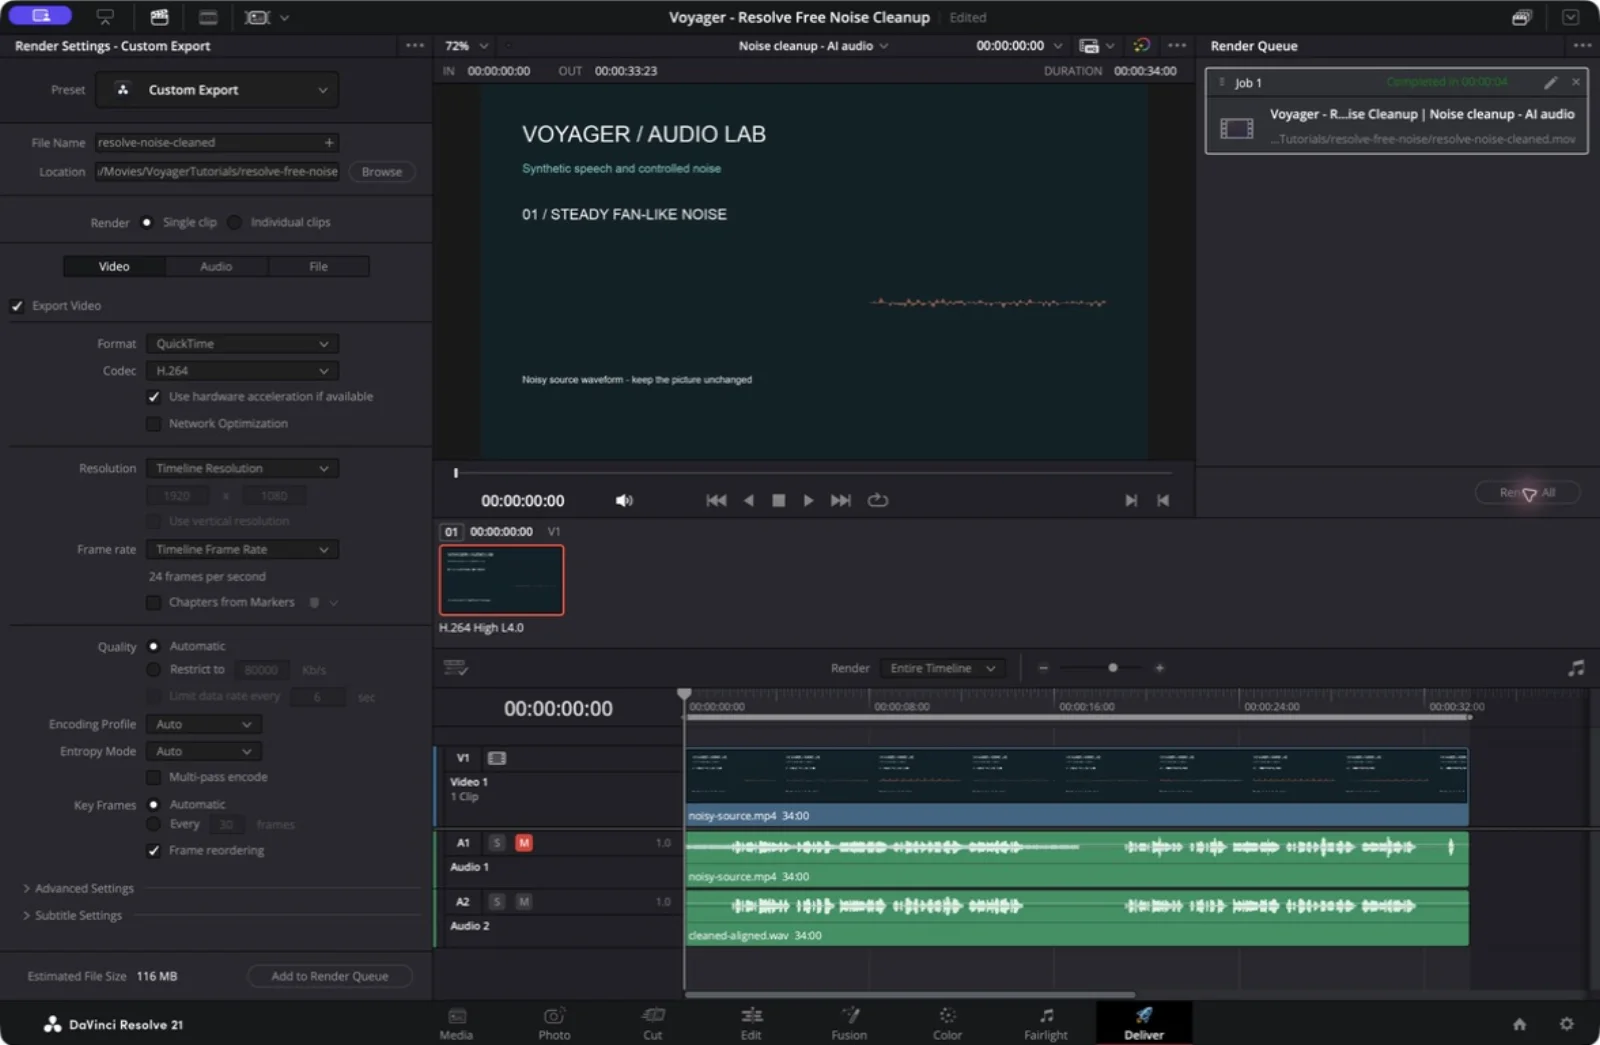
Reopen the exported file and check that the intended audio was used. In our verification, the native export was exactly 34 seconds long. Its audio matched the aligned WAV after accounting for a tiny level difference, confirming that the noisy original had not been mixed back in.
The picture deliberately continues to display the noisy source waveform. Only the sound was replaced. Download the finished MP4 or open the Resolve project from the sample bundle. If its media appears offline, relink it to the bundled source files.
Keep the result that serves the recording
Keep the original audio, the untouched model response, and the aligned working copy. Those three files let you undo the cleanup, inspect a timing issue, or use different treatment on a difficult sentence.
This workflow is useful when you want to try hosted voice cleanup while keeping Resolve Free as your editor. It does not establish that an external model is better than Studio's Voice Isolation, or that AI can recover speech which was never recorded clearly. For other ways to extend the editor, see AI plugins for DaVinci Resolve.
Test method and downloadable evidence
The test ran on September 18, 2026 with DaVinci Resolve Free 21.1 on macOS. A synthetic English voice was mixed with deterministic generated noise in two 17-second conditions. There was one Audio Isolation request for the combined 34-second WAV, made through fal's hosted MCP endpoint using an environment-provided credential.
The listening copies used constant gain derived from FFmpeg's integrated-loudness measurement. Timing was checked in four speech windows. In selected speech-free windows, measured residual levels fell by roughly 62 dB for the steady-noise case and 64 dB for the late burst window. These measurements describe those windows, not noise rejection during speech or a perceptual voice-quality score. The original clean speech and measurement scripts are included so readers can inspect the comparison.
Resolve imported the FCPXML, the original track was muted in the native UI, and the final video was rendered in Resolve. No external Resolve scripting connection was required. The bundle includes the project, media, returned model audio, fixture-generation scripts, and timing/export reports. It contains no API key or signed upload URL.
Make your next project in Voyager
Create an account, download Voyager, and start making.