To stabilize video in DaVinci Resolve Free, select a timeline clip, open Inspector → Video → Stabilization, choose a mode, and click Stabilize.
The comparison above shows what that does on genuinely shaky footage. Watch the road markings and lamp posts on the left: they jump as the handheld camera moves. On the right, Similarity stabilization in Resolve Free 21.1 removes much of that rapid movement while the car continues along the road.
This is real camera shake, not an effect added to make the demonstration look stronger. We used the untreated half of a public-domain handheld telephoto example and made fresh exports in Resolve. The source is low resolution; the test demonstrates motion correction, not image enhancement.
The practical tradeoff is visible too: the corrected picture is slightly tighter. This guide shows how to get that improvement, compare the three modes, and keep the crop under control.
Download the source, native render, comparison videos, and editable Resolve project. The bundle is about 31 MB. The stabilization uses Resolve Free's built-in controls; no paid AI model or plugin is required.
1. Decide which movement you want to remove
Watch the untreated clip before opening the stabilizer. Identify something that should behave predictably, such as a tree trunk, a building edge, or the horizon. Moving water, leaves, and people are poor references for judging camera shake because they can move independently of the camera.
Then describe the intended shot:
- Mostly stationary composition: remove distracting bumps or rocking while keeping the subject framed.
- Pan or tilt: retain the overall camera move and reduce the small disturbances within it.
- Walking or moving through a scene: expect a harder problem. Nearby and distant objects move differently, and stabilization may make that difference more noticeable.
Do this on a duplicate timeline or a separate test copy. Keep an untreated version so you can compare the same moment without relying on memory.
Our project has four consecutive copies of the same eight-second excerpt. The first stays untreated; the other three use different modes. The editing source is 490×344 at 30 fps, with its pixel shape and timestamps normalized before import.
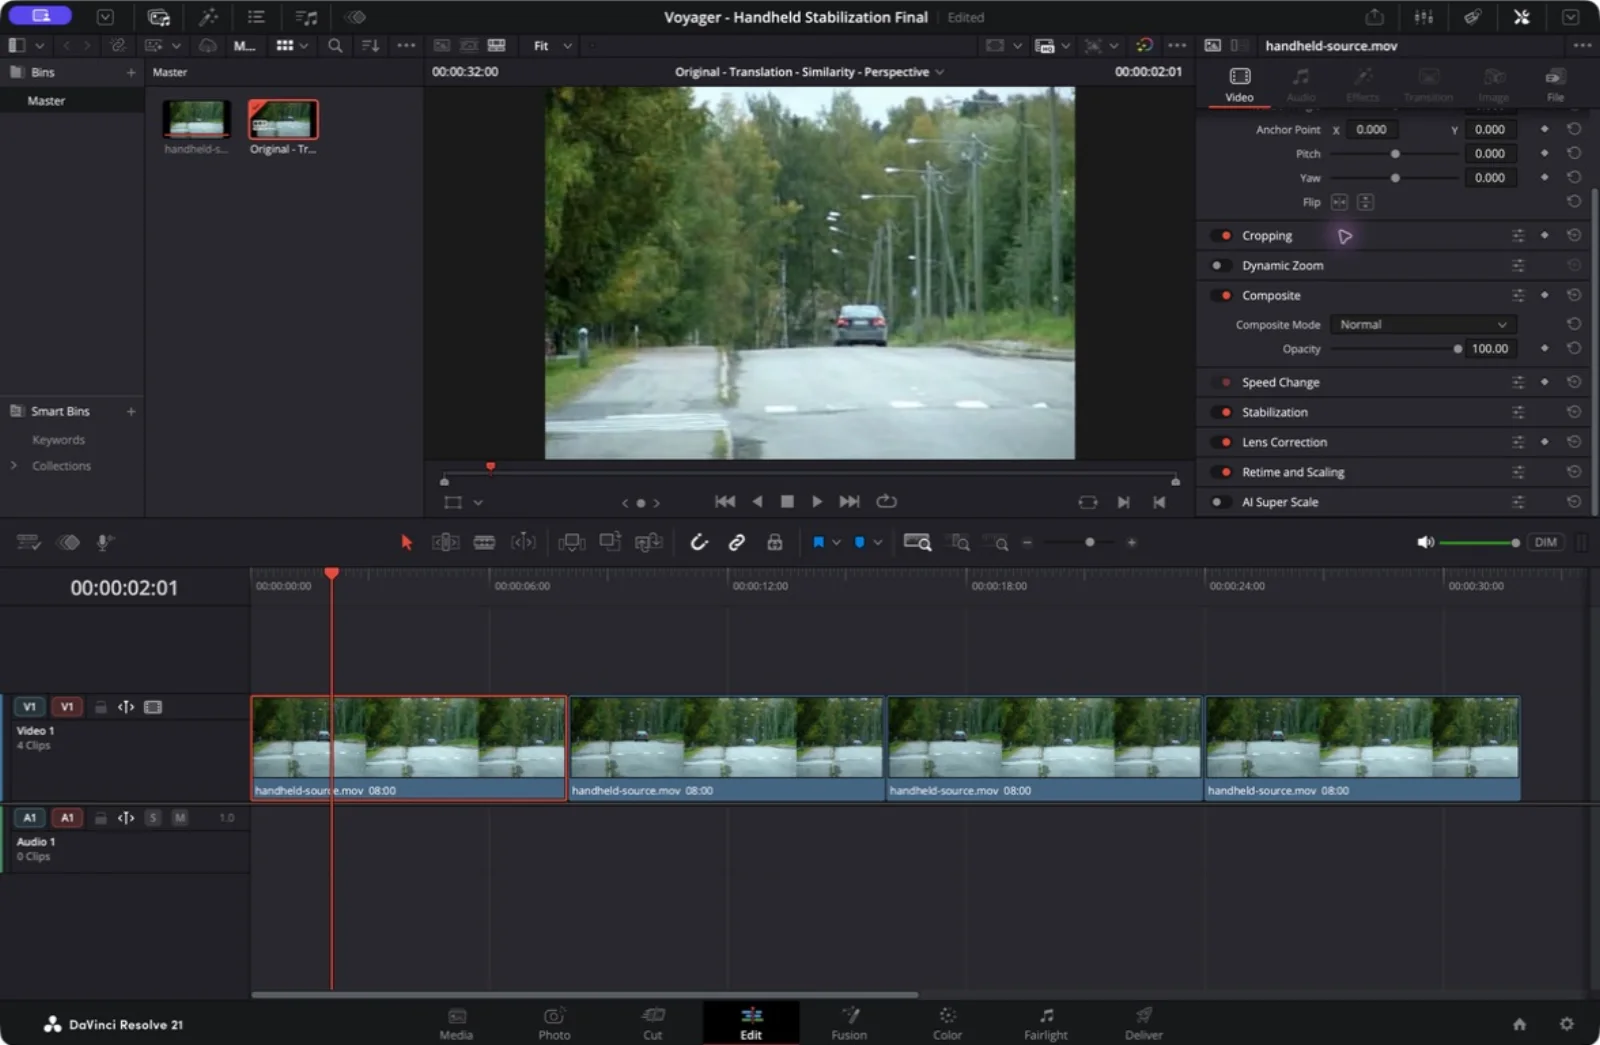
2. Open the clip's Stabilization controls
On the Edit page:
- Select the clip in the timeline, rather than its source in the Media Pool.
- Open Inspector at the upper right, then select Video.
- Scroll down and expand Stabilization.
- Choose a Mode, then click Stabilize and let the analysis finish.
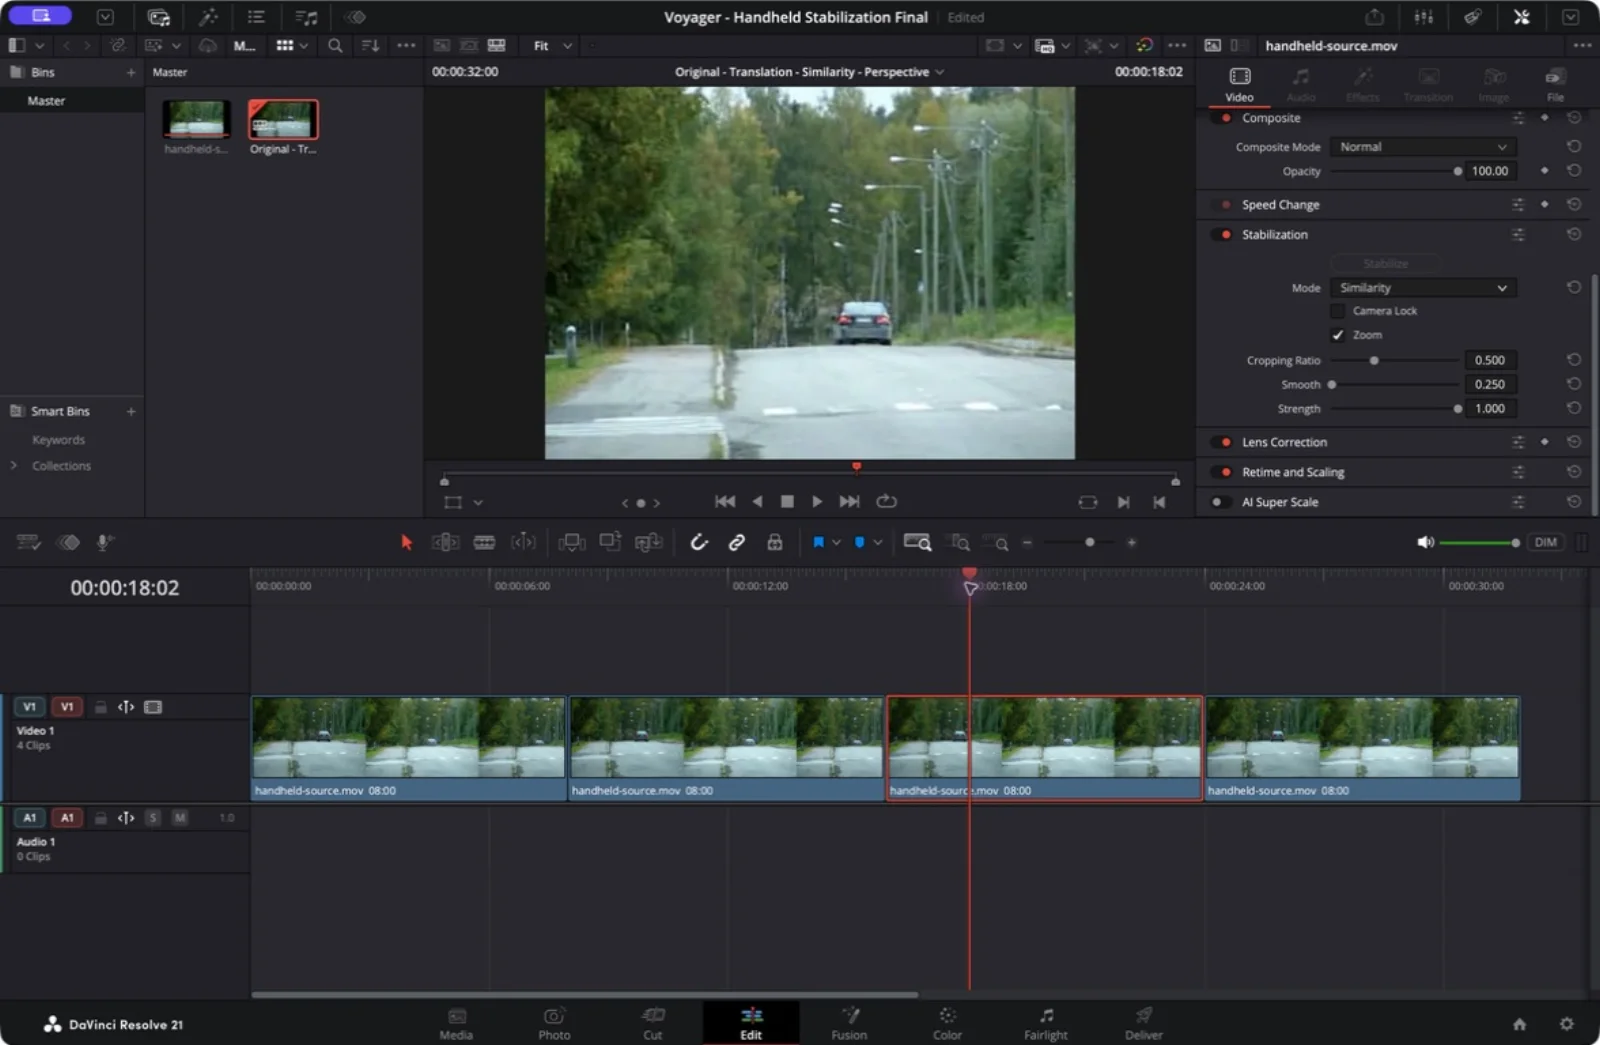
Choose the mode before running the analysis. If you change modes, click Stabilize again. Blackmagic's Resolve reference manual explains that the mode changes the analysis, not just the label on an existing result. The manual is also available from Resolve's Help menu.
The viewer can show a different moment from the clip selected in the Inspector. Put the playhead inside the selected clip before judging its result. Otherwise, you may adjust one copy while watching another.
3. Compare Translation, Similarity, and Perspective
These modes allow different kinds of correction:
| Mode | What it can change | A useful reason to try it |
|---|---|---|
| Translation | Horizontal and vertical position | The frame mainly jitters sideways or up and down |
| Similarity | Position, rotation, and scale | Translation leaves distracting rocking or size changes |
| Perspective | Those changes plus perspective deformation | The simpler modes do not handle the camera movement well |
These are the mode distinctions documented in Blackmagic's manual. They are not a quality ranking. Perspective gives the stabilizer more freedom to change the image; that freedom can help a shot or create an unwanted result.
I would start with Translation when the problem looks like small positional jitter, then try Similarity if rotation remains. Try Perspective when the simpler options are not solving the problem, and compare the shape of rigid objects as well as the smoothness of the motion.
For a fair first comparison, keep the other settings fixed. The three treated copies in our test used:
| Control | Test value |
|---|---|
| Camera Lock | Off |
| Zoom | On |
| Cropping Ratio | 0.500 |
| Smooth | 0.250 |
| Strength | 1.000 |
These are a baseline for this test, not values every clip should use. Each mode received its own native analysis and export.
What the three-mode comparison shows
All three treatments remove much of the obvious frame-to-frame jumping. The biggest difference here is between the untreated source and the corrected versions. Similarity is the result featured at the top; Perspective does not offer an obvious reason to prefer it on this particular shot.
The car still moves, and some slower camera drift remains. That is expected with Camera Lock off. Stabilizing a shot does not mean freezing everything in it.
Look at the white road markings near the bottom and the lamp posts on the right. These are fixed scene features, so their rapid movement is a useful reference for camera shake. The moving car is not. Compare the same timestamps rather than different moments of the shot.
The full-resolution native render in the bundle has four sections: Original at 0–8 seconds, Translation at 8–16, Similarity at 16–24, and Perspective at 24–32. The synchronized panels above are assembled from those exports.
4. Keep Camera Lock separate from smoothing
Camera Lock asks the stabilizer to pursue a stationary shot. It also disables Cropping Ratio and Smooth, as described in the reference manual. Use it when a fixed composition is the intended result, rather than treating it as a stronger general-purpose smoothing option.
For this comparison, Camera Lock stays off in every treated version. The goal is to reduce the shake while allowing slower movement to remain.
For a deliberate pan or tilt, preserve the overall camera move. Start with Camera Lock off and assess whether smoothing improves the small disturbances without making the move hesitate or drift. The handheld example here does not establish the best settings for every kind of camera movement.
5. Control the framing cost
Stabilization moves or transforms the recorded image within a fixed output frame. That can expose areas beyond the original picture. Resolve's Zoom option enlarges the image to hide those uncovered edges, which means some original framing is lost.
This is separate from changing the export resolution. You can still deliver a 1920×1080 file while showing a narrower portion of the recorded scene.
The controls have different jobs:
- Zoom hides exposed image boundaries by enlarging the picture. Turning it off can reveal those boundaries; it does not reconstruct missing footage.
- Cropping Ratio limits how much correction and resulting edge loss Resolve accepts. Lower values allow more aggressive stabilization. It is not a literal “percentage cropped” readout.
- Smooth changes how strongly the movement is smoothed over time.
- Strength scales the correction. Reducing it lets more original motion remain.
Blackmagic documents these controls in the manual's Stabilization section. After changing Cropping Ratio or Smooth, run Stabilize again. Strength adjusts the use of the existing analysis.
If the result cuts off something important, change one control at a time. First compare a simpler mode or reduce Strength. If needed, raise Cropping Ratio to constrain the correction and reanalyze. Check the beginning and end as well as the middle; a framing decision that works on one frame may fail as the camera moves.
The ordinary Transform → Zoom control is a separate operation. Avoid adding another zoom before you know what the stabilizer is already doing. If you also need a portrait delivery, budget for both operations: stabilization and reframing horizontal footage to vertical.
6. Check motion and geometry before exporting
Play the entire result at normal speed. Then inspect the troublesome moments frame by frame. A still image cannot show a sudden correction or a background that seems to stretch and relax.
| Problem you see | Next thing to test |
|---|---|
| The horizon still rocks | Compare Similarity with Translation |
| A rigid edge bends or the scene appears to “breathe” | Compare a simpler mode and reduce the correction |
| Too much of the composition disappears | Reduce Strength or constrain Cropping Ratio, then check the edges again |
| A deliberate move becomes awkward | Check Camera Lock, reduce Smooth, and reanalyze |
| Little visible improvement | Compare against the untreated clip; keeping the original may be preferable |
These are troubleshooting experiments, not guaranteed fixes. The comparison does not show a dramatic Perspective failure, and it should not be read as proof that Perspective always warps footage.
Also distinguish unstable framing from blur within a frame. Stabilization can change where a blurred image sits; it does not recover detail the camera failed to record. If individual frames smear badly, a smoother trajectory alone will not make the footage crisp.
On Deliver, confirm the intended dimensions and frame rate, render the clip, and inspect the exported file. Our comparison timeline exported 960 frames at 30 fps, for 32 seconds containing four eight-second versions. Check the exported motion as well as the file dimensions; successful analysis alone does not prove a good result.
Do you need Studio or an AI assistant?
The three modes demonstrated here ran and rendered in DaVinci Resolve Free 21.1 on macOS. You do not need to buy Studio or use a cloud service to reproduce this test. For other edition differences, see Resolve Free vs Studio.
An assistant can help prepare comparison timelines, organize exports, and check file dimensions and timing. In this example, Codex prepared the source excerpt and timeline file, then operated Resolve's interface. Resolve performed the stabilization itself.
If you delegate that preparation, ask for an untreated reference and separately labeled versions with recorded settings. The useful output is an editable comparison you can judge in motion, not a claim that the agent found a universally optimal number.
Test method, project files, and source credits
Tested September 18, 2026, in Resolve Free 21.1 on macOS. The source is an eight-second excerpt from the left-hand Original panel of Video image stabilization by Oggencoder, released into the public domain by its creator. The source description identifies a handheld Konica Minolta DiMAGE Z1 at a 350 mm-equivalent focal length.
The published file also contains a previously stabilized right-hand panel. That panel is not used in our test or presented as a Resolve result. We extracted seconds 1–9 from the original left panel, removed its top label strip, normalized the non-square pixels to approximately square pixels, and prepared a silent 490×344, 30 fps ProRes editing source. No artificial shake or AI enhancement was added.
Each treated timeline copy was analyzed and rendered in Resolve. The full native H.264 export was remuxed from QuickTime to MP4 without re-encoding the video. The simultaneous comparisons add labels and web compression. This older, compressed footage demonstrates a visible correction; it is not a benchmark of modern HD or 4K footage, severe rolling shutter, or every kind of motion blur.
Download the files, extract the ZIP, and import the DRP through Resolve's Project Manager. If media appears offline, select handheld-source.mov in the Media Pool and use Relink Selected Clips to point to the extracted folder. The bundle includes the normalized source, native export, both comparisons, project, and preparation notes. No endorsement by the source creator is implied.
Make your next project in Voyager
Create an account, download Voyager, and start making.