To make smooth slow motion in DaVinci Resolve Free, reduce the clip's speed, then choose how Resolve fills the extra time. Nearest repeats existing frames, Frame Blend mixes neighboring frames, and Optical Flow estimates new ones.
The comparison above shows the same three-second shot slowed to 25% speed. On the left, Nearest makes the walking motion visibly step between poses. On the right, Optical Flow with Enhanced Better makes that movement smoother. Both were rendered in Resolve Free 21.1 on macOS.
Smoother does not mean every new frame is correct. Farther down, a close-up shows the eye/beard boundary becoming smeared as one person passes in front of another. The point of this tutorial is to get the improvement and recognize where the interpolation needs closer inspection.
Download the source, three slow-motion versions, native export, and editable Resolve project. No Studio upgrade or paid AI service is needed for the tested settings.
1. Check whether your footage already has enough frames
High-frame-rate footage can supply real captured frames for slow motion. Footage recorded at your delivery frame rate cannot do that indefinitely.
For one captured frame per output frame, the playback speed is:
Timeline fps ÷ source fps × 100
| Source → timeline | Playback speed | Result |
|---|---|---|
| 60 fps → 24 fps | 40% | One second of recording becomes 2.5 seconds |
| 120 fps → 24 fps | 20% | One second becomes five seconds |
| 24 fps → 24 fps | 100% | Slowing below this needs repeated, blended, or estimated frames |
Use the exact rates for your footage. The table uses integer rates, not rounded labels for 23.976 or 59.94 fps.
Our test deliberately uses 24 fps footage in a 24 fps timeline. At quarter speed, each output second contains only six distinct captured frames. Resolve must supply the remaining pictures somehow. That makes the differences between the three methods easy to see.
Keep the original clip frame-rate interpretation for the workflow below. Reinterpreting a high-frame-rate source in Clip Attributes is another way to conform it; combining that with an additional speed reduction can slow it more than intended.
2. Change the clip speed and allow room for the longer result
On the Edit page:
- Select the timeline clip.
- Choose Clip → Clip Speed → Change Clip Speed.
- Enter the desired Speed. We used 25%.
- Enable Ripple Timeline if you want later clips to move to accommodate the longer clip. Check the surrounding edit before applying it.
- Click Change.
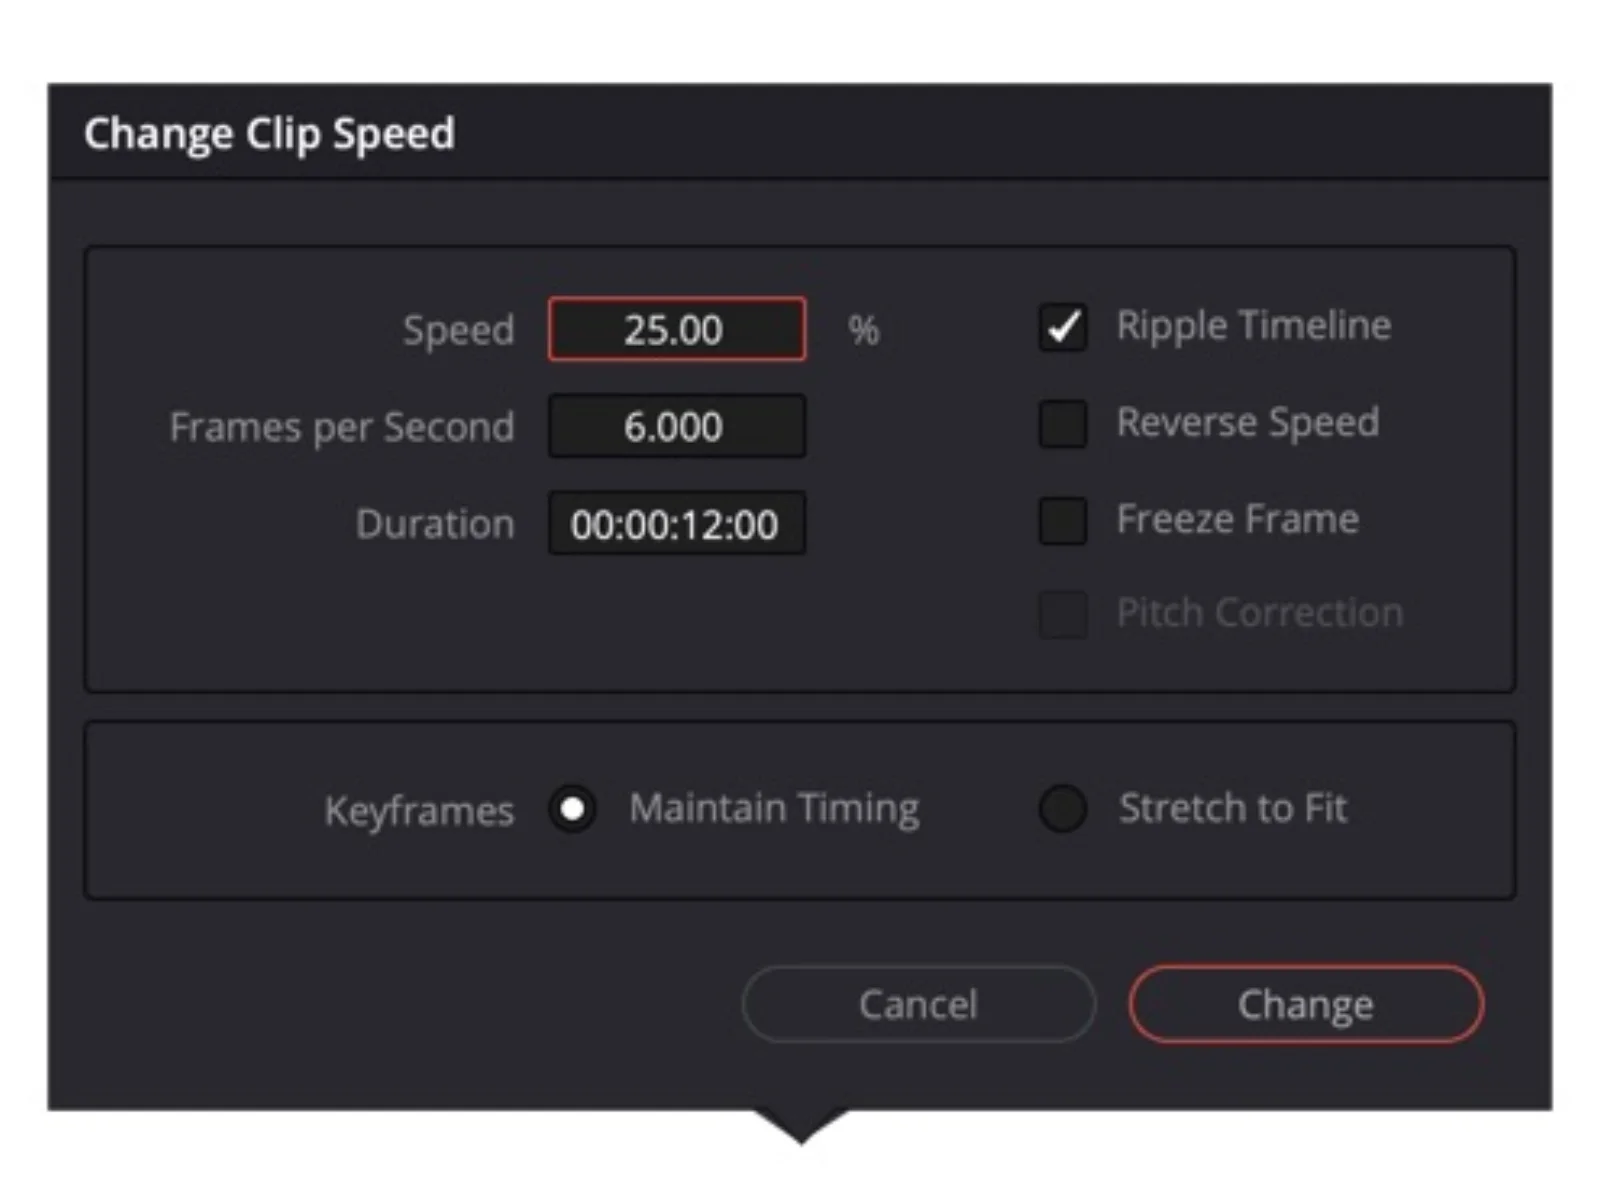
A 50% speed makes a clip twice as long; 25% makes it four times as long. In this example, three seconds becomes twelve seconds.
The dialog's Frames per Second value becomes 6.000 because the source is progressing at six captured frames per second. That does not change the timeline's 24 fps delivery rate.
Work in a duplicate or test timeline first. Slowing a clip can affect the timing of everything that follows it, including music, captions, and cuts. Our test is silent so the picture is the only variable.
3. Choose a Retime Process for the selected clip
Open Inspector → Video → Retime and Scaling. Set Retime Process explicitly on the test clip so you know which method you are comparing.
| Method | What Resolve does | What to inspect |
|---|---|---|
| Nearest | Repeats existing pictures | Stepping or judder during movement |
| Frame Blend | Dissolves between adjacent pictures | Double outlines and ghosted faces |
| Optical Flow | Estimates motion and synthesizes intermediate pictures | Warped or smeared boundaries, especially during overlap |
These distinctions follow Blackmagic's reference manual, Frame Interpolation section. The manual also cautions that crossing motion can produce Optical Flow artifacts.
For the Optical Flow version, set Motion Estimation → Enhanced Better. This combination rendered successfully in our Free installation. It is separate from the AI Speed Warp options, which belong to Resolve Studio.
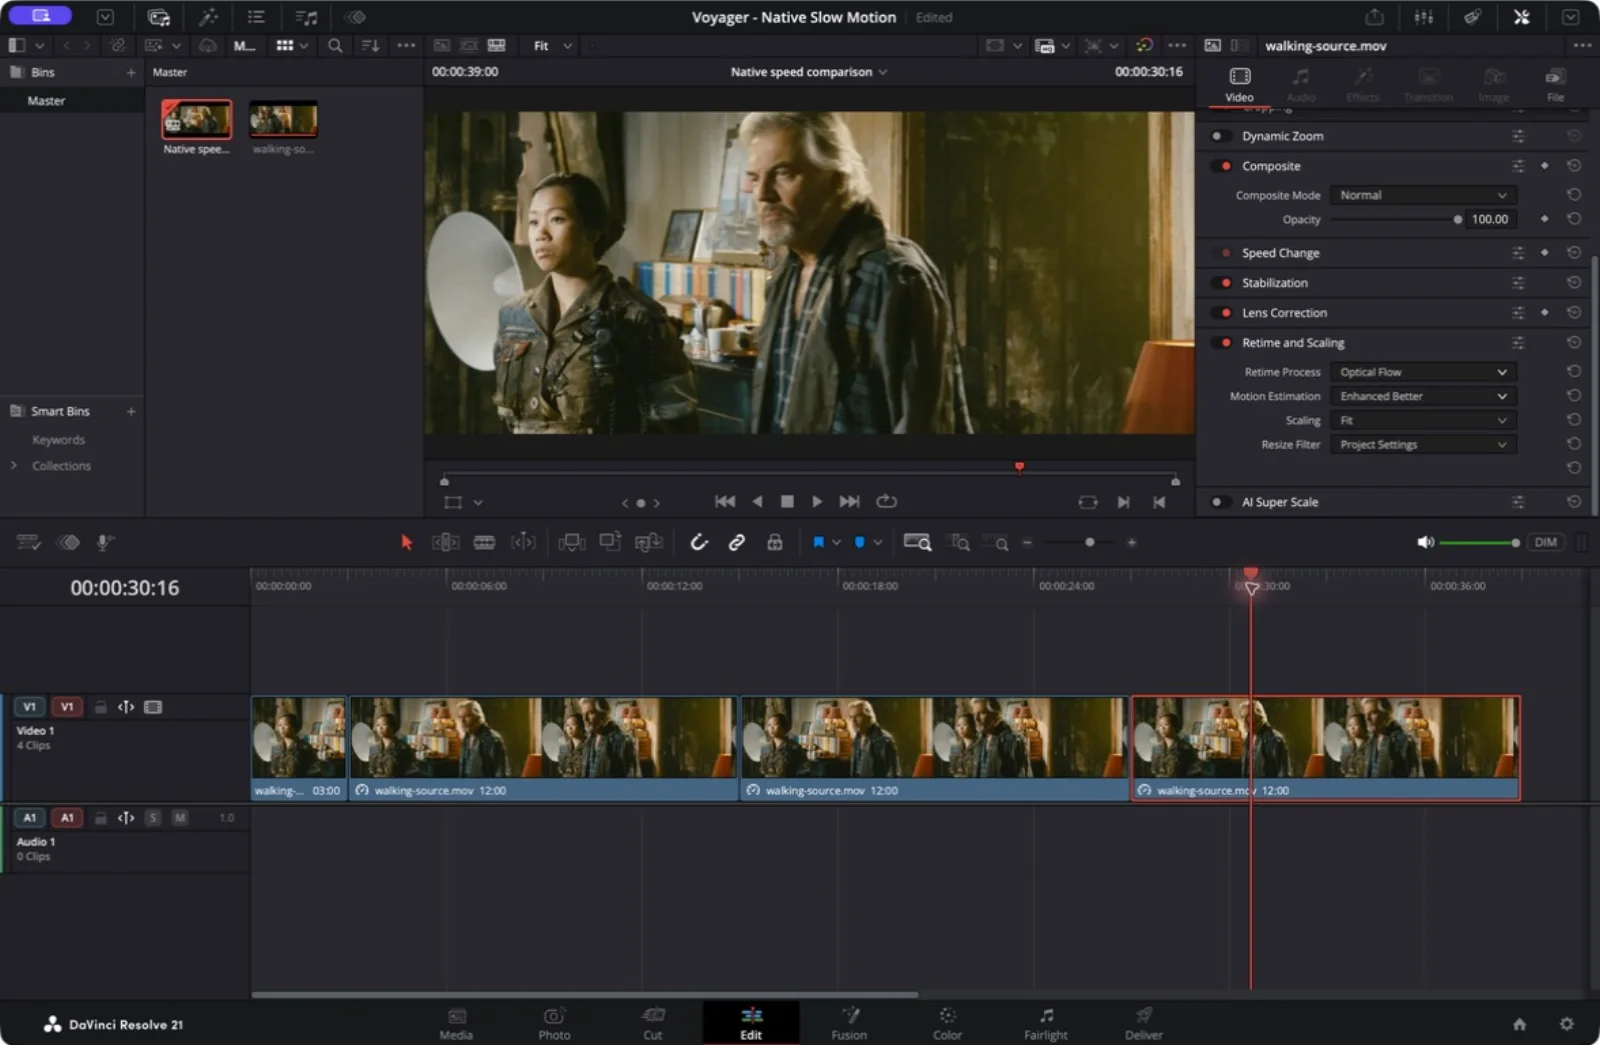
Nearest remains useful when you have enough captured frames or deliberately want a stepped look. Optical Flow is worth testing when repeated frames make the motion distracting. Do not assume a more complex method is automatically better for every shot.
4. Compare the same moment, not different parts of the shot
The walking shot gives us two useful moments: the man moving across the room, then crossing in front of the woman. The first makes stepping and ghosting easy to see; the second tests how the interpolation handles an object becoming hidden.
The main comparison uses three copies of the same source at the same speed:
- Nearest: 25% speed.
- Frame Blend: 25% speed.
- Optical Flow: 25% speed, Enhanced Better.
Watch the man's face and the stripes on his shirt. Nearest holds and jumps between captured poses. Frame Blend changes more continuously, but moving details appear in two places at once. Optical Flow follows the movement more convincingly through much of the shot.
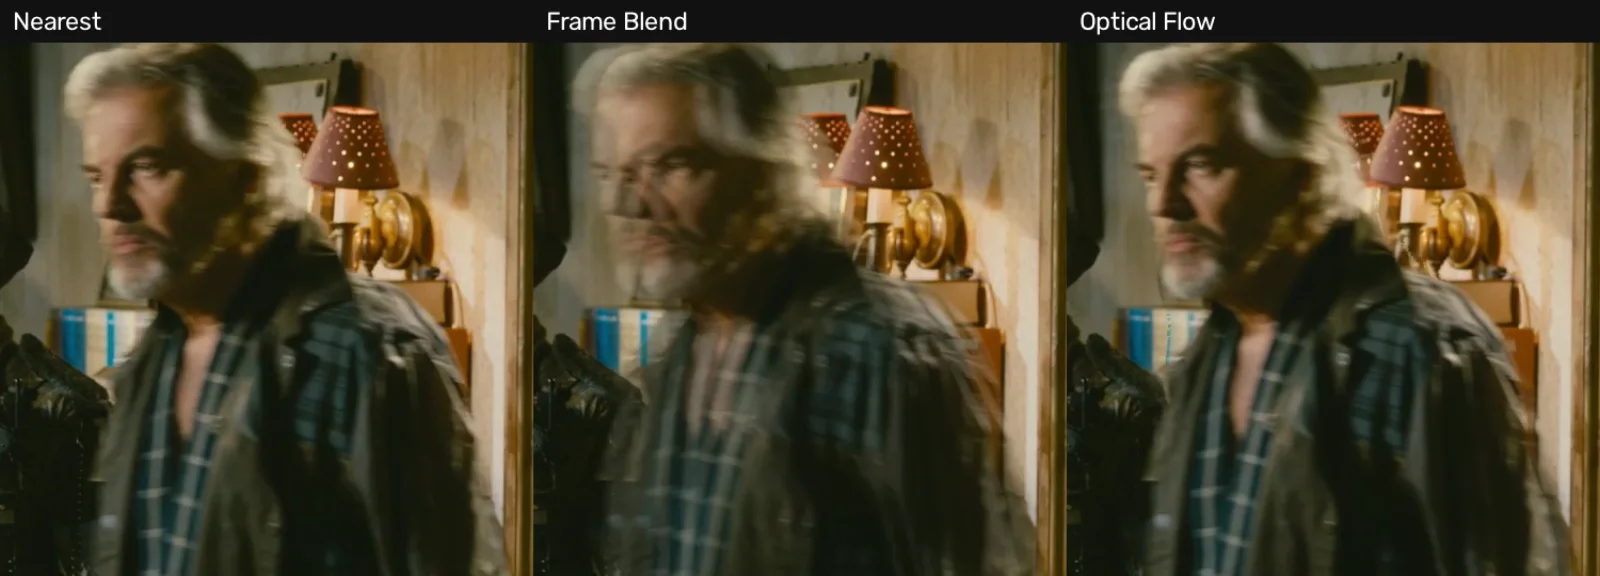
These are crops from the native exports. A still can expose a double edge, but it cannot show Nearest's stepping. Use both the moving comparison and the frame detail when judging the result.
5. Inspect the frames where subjects overlap
At 00:00:06:18 in the slow-motion version, the man is passing across the woman's face. The Optical Flow intermediate is between source frames 40 and 41, counting from zero.
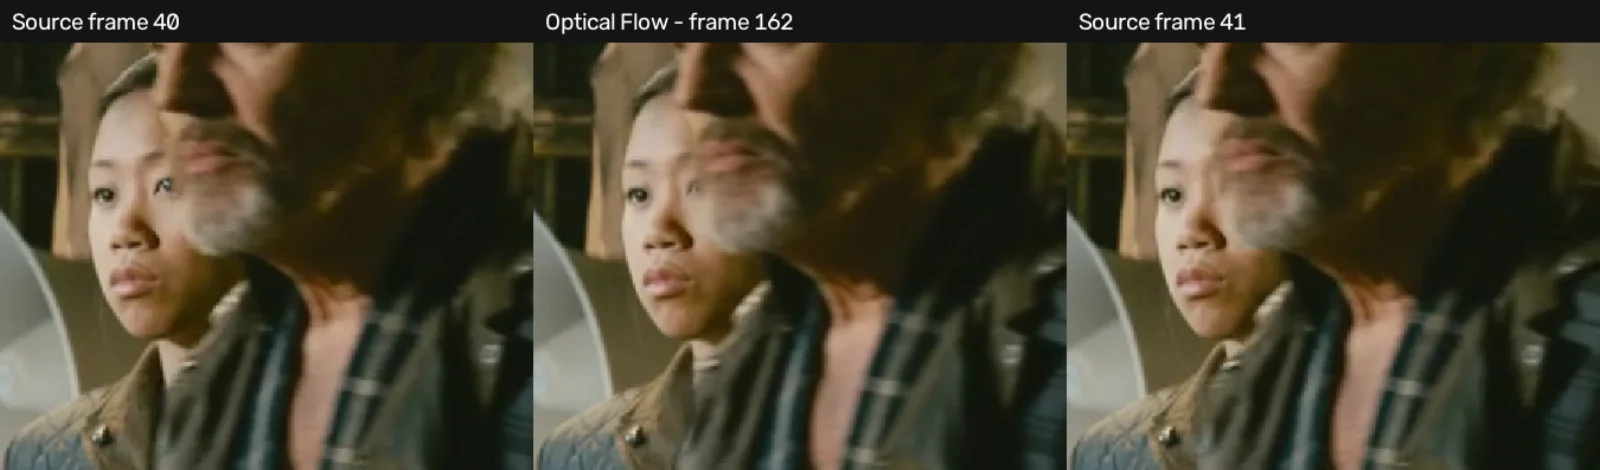
The overall movement is smoother, but that boundary is less coherent than the captured pictures on either side. This is a localized artifact, not a claim that the entire Optical Flow result fails. It is also why checking only a few clean frames can miss a problem.
If an artifact is visible at the final viewing size:
- Try a less extreme slowdown, such as 50% instead of 25%.
- Compare a different motion-estimation setting on that shot.
- Consider Frame Blend or Nearest if their tradeoff is less distracting.
- Trim around the problematic moment or use a different take.
There is no setting that recovers frames the camera never recorded. Optical Flow can also preserve or spread motion blur already present in the source. It does not make a blurred face sharp simply because its movement becomes smoother.
6. Render a short section before judging playback
Optical Flow needs more processing than frame repetition. If the viewer cannot maintain the timeline frame rate, preview stutter can obscure the result you are trying to assess.
Render a short representative section on Deliver and watch that file outside the edit interface. Confirm the intended resolution, frame rate, and duration. Include the difficult overlap, rather than exporting only the cleanest part.
Our three slow-motion versions each contain 288 frames at 24 fps, lasting 12 seconds. The full comparison timeline is 39 seconds / 936 frames: normal playback at 0–3 seconds, Nearest at 3–15, Frame Blend at 15–27, and Optical Flow at 27–39.
For your own footage, keep separate checks for camera stabilization and vertical reframing. A smoother retime does not fix camera shake or keep a moving subject inside a tighter crop.
Test setup, project files, and footage credit
Tested September 18, 2026, in DaVinci Resolve Free 21.1 on macOS. The source is a silent, three-second, 1280×534, 24 fps excerpt from Tears of Steel. It has 72 captured frames. We used a ProRes editing intermediate and applied speed changes with Resolve's native Change Clip Speed command. The assistant prepared the files and operated the editor; Resolve generated the interpolated frames.
Download the bundle, extract it, and import Voyager-slow-motion.drp through Resolve's Project Manager. Relink walking-source.mov from the Media Pool if it appears offline. The saved project uses Enhanced Better for the Optical Flow copy. The native H.264 QuickTime export was remuxed to MP4 without re-encoding the video; the individual viewing copies and labeled comparison use additional web encoding.
The close-ups show exported pixels, with cropping, enlargement, and labels. This is one live-action shot at one slowdown ratio, not a broad benchmark of every motion-estimation mode or camera format.
Footage: (CC) Blender Foundation | mango.blender.org, Tears of Steel (2012), directed by Ian Hubert. Licensed under Creative Commons Attribution 3.0; see the project's sharing terms. Modifications include excerpting seconds 179.5–182.5, removing audio, format conversion, native retiming, and comparison crops and labels. No original soundtrack is included, and no endorsement by the performers is implied.
Make your next project in Voyager
Create an account, download Voyager, and start making.